Vermicomposting is an easy and effective method of converting organic waste into nutrient-rich compost with the help of worms. Unlike traditional composting methods, you don’t need a special outdoor location for worm composting. Instead, you can set up a small space indoors where the temperature is controlled, making it easy to create compost without generating foul odors. However, it’s important to control the temperature correctly when carrying out this composting process outdoors. Providing shade for the worms in excessively hot weather and ensuring they receive sunlight in cold weather is essential. Worm composting can be a timely step towards promoting the healthy growth of plants.
What Is Vermicomposting
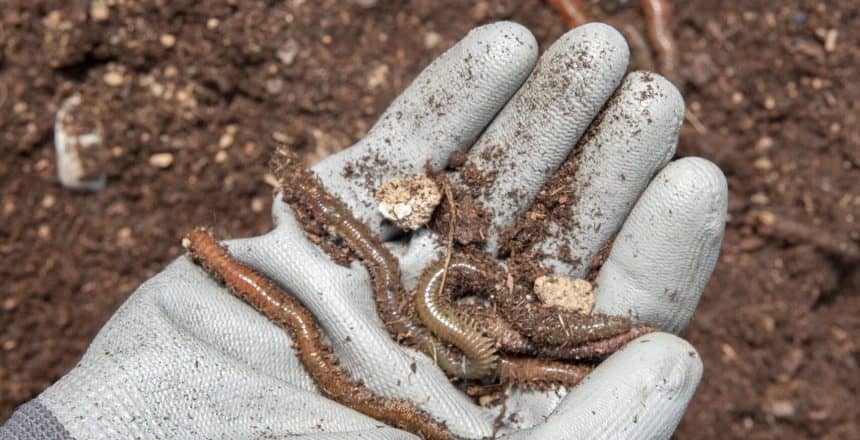
Vermicomposting, is a modern and scientifically proven method of producing compost with the assistance of vermiculture, where worms and microorganisms play a key role in the composting process. These organisms primarily decompose organic materials such as food scraps, animal manure, and agricultural residues, expediting the composting process. The compost produced through vermicomposting is rich in essential nutrients such as nitrogen, phosphorus, manganese, calcium, and potassium, making it highly beneficial for enhancing soil fertility and promoting healthy plant growth in agriculture.
Preparing A Worm Habitat
To begin composting, start by creating a sturdy bed using newspaper or corrugated cardboard, cut into 1-inch (2.5 cm) strips. Layer these strips about 8 inches (20.3 cm) high in the compost bin. Thoroughly moisten the bedding before adding a 7-8 inch (17.8-20.3 cm) layer at the bottom of the bin. Worms, which naturally reside in soil, will feel more comfortable with some bedding. Adding moistened soil or potting mix on top of the bedding can further enhance their environment.
Next, evenly spread a layer of food scraps, such as fruit and vegetable peels, leaves, plant trimmings, eggshells, tea bags, and coffee grounds, on top of the soil layer. Avoid meat and fatty foods, as they can create strong odors during decomposition. Cover the bin and leave it closed for one to two weeks. When you open it, you’ll find that the food scraps have partially decomposed into rich compost. Your bin is now ready for the addition of composting worms.
What To Put In Worm Bins
After selecting the correct location and composting bin, gather the necessary materials for your compost bin. The best worms for vermicomposting are Red Wigglers, African Nightcrawlers, and Composting Worms. If these are not available locally, you can order them online from various suppliers. Worms are usually sold by weight, with one pound (0.45 kg) containing approximately 1,000 worms, which is generally sufficient to start a worm bin.
To maintain a healthy composting system, balance nitrogen-rich and carbon-rich materials. Your compost bin should have 70% carbon and 30% nitrogen. Nitrogen-rich materials include kitchen waste such as vegetable and fruit peels, grass clippings, and rotten fruit. Carbon-rich materials include pieces of paper, eggshells, coconut husks, dry leaves, and specific animal manures.
Processing Of Vermicomposting
Composting is an effective method for reducing reliance on synthetic fertilizers and naturally improving soil quality. If you don’t have ample outdoor space for traditional composting, vermicomposting provides a convenient alternative. By setting up an indoor composting system with a worm bin, you can effectively compost even in limited space.
Pick A spot To Set Your Compost Bin
Vermicomposting can be done both indoors and outdoors. Typically, outdoor composting can be challenging because you need to maintain the temperature consistently. However, if you don’t have enough space outside, you can start it indoors, which can be a proper step. Choose a small space in your home to keep the compost bin. Temperature and moisture are crucial for this composting method. In this case, you may need to avoid excessively hot locations or using air conditioning. Although vermicomposting doesn’t produce excessive odor, still, place it slightly away from main living areas. The size of the space depends on how much compost you plan to produce and the size of your compost bin.
Choose Worm Bin
Worm compost bins differ from regular compost bins. Various types of compost bins designed for vermicomposting are available on the market. We recommend the Worm Factory 360 composter, which comes in different sizes and shapes, allowing you to select one based on your available space. If you prefer a DIY approach, you can create a compost bin at home using three plastic containers with small holes in the bottom. Stack these containers on top of each other to form your compost bin.
Prepare Bedding Material
The most commonly used bedding material for compost bins is newspaper. Additionally, you can use cardboard and coir. Shred newspapers into narrow strips about 1 inch wide, using 50 sheets. Cut cardboard into small pieces so it can decompose easily. Shred coir into small pieces and moisten it thoroughly. Properly preparing newspaper, cardboard, and coir as bedding materials in compost bins will create a comfortable environment for the organisms and ensure successful decomposition.
Temperature Maintain
Controlling the temperature is crucial for effective composting, whether outdoors or indoors. In hot weather, provide shade to prevent overheating. In colder conditions, sunlight can help maintain warmth. During warm seasons, temperatures above 30°C (86°F) are optimal, while cooler temperatures are preferable in winter. For indoor composting, maintain temperatures between 15°C and 25°C (59°F and 77°F) to facilitate decomposition. Keep the compost bin away from heaters, ovens, and air conditioners, as these appliances can generate excess heat and emit unhealthy air, disrupting the composting process.
Add Worms
Now it’s time to add worms to your compost bin. Create a trench in the middle of the bedding in your compost bin and place the worms there. You can create two trenches if needed to evenly distribute the worms. You’ll need to add food for the worms regularly. For every thousand worms, add about 1/2 pound (226 grams) of food per week. Maintain this ratio based on the number of worms you have.
Harvest Your Compost
The amount of compost you produce, the quantity of worms you add, and how well you maintain them will determine your composting time. Typically, it takes about three to six months to obtain your finished compost. Once composting is complete, it will turn into a rich, dark color, but the exact hue and texture depend on the composting process. Within three to four months, you can start collecting compost from the bottom tray. Similarly, in the following month, collect compost from the second tray. This way, you can collect compost gradually and effectively.
Benefit Of Vermicomposting
Worm compost plays a supportive role in soil and plant health and growth. This compost enhances plant structure and enriches soil, facilitating water infiltration and air exchange. It adds essential elements like nitrogen, potassium, phosphorus, and other nutrients to the soil, ensuring consistent moisture and retention. Vermicompost contains growth hormones such as auxins and gibberellic acid, which promote plant growth. Being entirely organic, it also helps reduce soil, water, and air pollution. Additionally, composting allows for the production of compost quickly and at minimal cost through simple maintenance.
FAQ
Which is better, vermicompost or regular compost?
Vermicompost is often richer in nutrients and beneficial microorganisms, which promotes faster plant growth and better soil health. It also has a finer texture. Regular compost, though simpler to produce on a larger scale, still provides essential nutrients and organic matter. The choice depends on your specific needs and preferences.
What should not be added to a worm composter?
Avoid adding meat, dairy, fatty foods, and oily substances to a worm composter, as they can create odors, attract pests, and disrupt the composting process. Also, steer clear of citrus fruits and spicy foods, as they may harm the worms.
Should I remove dead worms from my worm bin?
Yes, remove dead worms from your worm bin to prevent potential issues. Dead worms can attract pests and lead to unpleasant odors. Regularly check for any dead worms, remove them promptly, and ensure optimal conditions—such as proper moisture, aeration, and temperature—to maintain a healthy composting environment.


