Vermicomposting, also known as worm composting, involves utilizing worms to break down organic matter, resulting in nutrient-rich vermicompost. Different species of worms assist in processing various types of kitchen waste through this method.While commercial worm composting bins are available, they can be pricey and require ample space due to their size. As a more accessible alternative, constructing your own worm composter can be a practical solution to overcome these challenges.
Before Getting Start
1. Select a Suitable Container: Choose a container with good ventilation and drainage, such as a plastic bin with holes or a purpose-built worm composter.
2. Gather Materials: Collect necessary materials including bedding (shredded newspaper, cardboard, or coconut coir), kitchen scraps (vegetable peels, fruit waste), and red wiggler worms (Eisenia Fetida).
3. Prepare Bedding: Shred newspaper or cardboard and moisten it until it feels like a damp sponge. This will serve as the worms’ habitat.
4. Choose a Location: Place the composter in a cool, shaded area. Avoid direct sunlight and extreme temperatures to maintain a stable environment for the worms.
5. Understand Worm Needs: Familiarize yourself with the worms’ needs, including their preference for a balanced diet, proper moisture levels, and pH balance.
6. Plan for Maintenance: Be prepared to monitor the composting process regularly, including checking moisture levels, turning the compost, and managing worm health.
Create Your Worm Composter
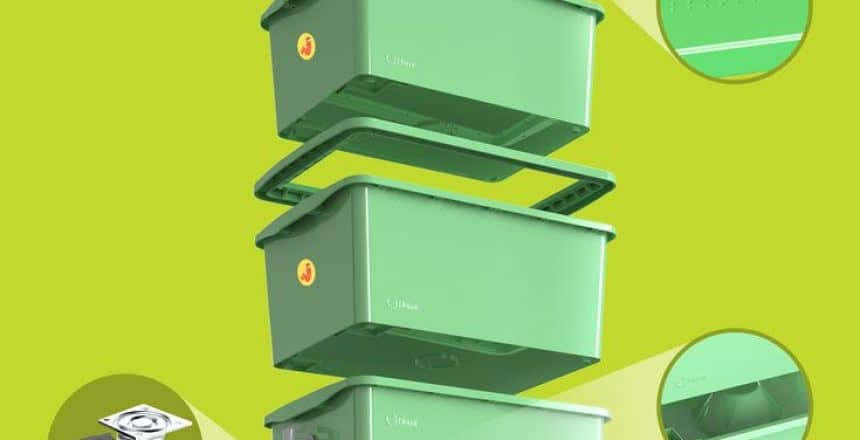
While any type of earthworm can be used for composting, the Red Wiggler worm is commonly considered the best for vermicomposting due to its efficiency. You can construct your own worm composter with a multi-level structure, where the worms reside on one level and receive their necessary food. As they produce vermicompost in one container, you can add bedding and food to the next container. The third container can be used to harvest worm compost tea. Below is a process for making a worm composter:
Select Containers
Before starting vermicomposting, you’ll need to select several containers. You can purchase these from the market if you prefer. Alternatively, if you’re on a budget, you can use plastic trays or containers available at home. The size of the three containers you’ll need to choose depends on your composting plans.
Drill Holes In The Containers
For vermicomposting, it’s necessary to create holes in the containers. Using a drill machine, make several 3/16-inch holes in the bottom of each container, spaced 1 inch apart. These holes will aid in air circulation within the container.
Next, on the top perimeter of the container, drill several 1/4-inch holes spaced 1 inch apart. These holes will provide necessary aeration for the rapid decomposition of food matter and the formation of compost.
On the lid of the container, drill numerous 1/4-inch holes. These will facilitate air circulation for the quick decomposition of organic matter. Be cautious not to overlook the third bin, as it’s crucial for collecting the liquid byproducts generated during the composting process.
Assemble The Vermivompost Bin
In a perforated container, add three to four inches of moistened shredded newspaper or cardboard and cover it. After a few days, add kitchen waste such as vegetable and fruit peels, grass clippings, green leaves, paper, wood scraps, and animal manure. Close the lid. After some time, introduce the appropriate amount of composting worms and close the lid again to start the composting process. Feed the worms in the compost bin weekly.
Add The Third Bucked
When the materials in the second container have been partially digested by the worms, it’s time to set up a new box. Add fresh bedding and food materials to the new container and keep the lid closed. As the contents of the second box decompose, the worms will naturally migrate upward to the new container to access fresh food and bedding.
Harvest The Compost
When most of the worms in your compost bin have migrated to the upper bin, you can begin harvesting the compost from the middle container. However, it typically takes three to six months to harvest the compost from the first bin. Remember, compost tea is produced in the lower container, and if left for too long, it can emit odors. Therefore, it’s best to use it for your plants as soon as possible. By following these steps, you can effectively harvest vermicompost and utilize it to nourish your plants and soil. Vermicompost is a versatile material that serves as an excellent soil amendment or mulch for virtually all plants.
Repeat The Process
If you want to continue vermicomposting, simply follow these steps: Once the compost in the intermediate container is finished, remove it. Then, use moistened newspaper or cardboard to create bedding in the empty container. Next, add kitchen scraps and carbon-rich materials from the kitchen. Finally, stack the container on top. This way, you can repeat the vermicomposting process gradually.
What Worms Use In a Wormery
Worm composting, or vermicomposting, primarily involves managing specific types of earthworms that reside in the top layers of soil rather than burrowing deep. These worms are specialized for composting and breaking down organic waste. The most popular species used for vermicomposting include:
Eisenia Fetida: Also known as tiger worms, red worms, brandling worms, or red wigglers. These worms are well-known for their ability to thrive in decomposing organic matter. They are highly efficient at converting kitchen scraps and other organic wastes into nutrient-rich compost.
Eisenia Hortensis: Also known as European night crawlers. These worms are larger than red wigglers and can burrow deeper into the compost pile. They are also effective in composting organic waste.
Both types of worms are suitable for converting kitchen waste and other biodegradable materials into valuable compost, which is rich in nutrients and beneficial for plants.
Benefit Of Worm Composter
The organic matter remaining from the worm composter is transformed into nutrient-rich compost, providing essential nutrients for plant growth and soil enrichment while reducing the need for chemical fertilizers. Worm composting is space-efficient and can be easily conducted indoors without much effort. When properly managed, it does not produce unpleasant odors and allows for year-round composting. Additionally, both compost and compost tea can be produced simultaneously with a worm composter, benefiting potting mixes, fruit and flower gardens, and seed starting.
FAQ
Is it difficult to make a worm composter at home?
Making a worm composter at home is relatively easy. You need a suitable container, bedding materials, and red wigglers. Ensure proper ventilation, moisture, and temperature control. With some basic setup and maintenance, you can create an effective composting system to recycle kitchen scraps into rich compost.
What kind of container is ideal for worm composting?
An ideal container for worm composting should provide good ventilation and drainage. Containers made of plastic, wood, or metal are commonly used. The container should have a lid and be deep enough to allow worms to live comfortably.


