The hydroponic system is a modern agricultural technique where plants are cultivated without soil, utilizing water as the medium to deliver essential nutrients to the roots. This method not only simplifies gardening but also promotes environmental friendliness. Hydroponic gardens are particularly advantageous for indoor spaces with limited area, as they eliminate the need for soil. In such systems, plants experience accelerated growth as they receive nutrients directly from the water. Below, we delve into a detailed discussion of hydroponic systems.
What Is Hydroponic System
Hydroponic gardening is a method of plant cultivation that uses water instead of soil to deliver the necessary nutrients to the plants. Various materials such as vermiculite, coconut coir, and perlite are added to the water to promote advanced plant growth. This method offers several advantages, such as rapid plant growth compared to soil-based cultivation and requiring less space. In hydroponic systems, water serves as the medium to provide nutrients, hydration, and essential oxygen to plants in the absence of soil. Compared to conventional agriculture, hydroponic systems can achieve desired plant growth, flower, and fruit production in half the time in many cases.
How To Work Hydroponic System
Hydroponics is a modern method of plant cultivation where water and necessary nutrients are supplied instead of soil, resulting in rapid plant production in a very short time. Nutrients essential for plant growth such as nitrogen, phosphorus, potassium, and micronutrients are mixed in water to create a nutrient solution, which is then supplied to the plants. The roots of the plants are directly immersed in the nutrient solution, allowing them to absorb the necessary nutrients for growth. Hydroponic systems do not use soil; instead, inert growing media such as vermiculite, coconut coir, and perlite are used to support the plants’ roots. These media provide aeration to the roots. In hydroponic systems, plants utilize chlorophyll present in their leaves and sunlight to split water molecules in the nutrient solution, producing the necessary food for themselves. Plants in hydroponic systems thrive in a controlled environment and receive essential nutrients, resulting in very rapid desired yields.
Best Plants For Hydroponic Garden
In a hydroponic system, almost any type of plant can be grown if the correct growing conditions are maintained. However, some plants excel in hydroponic systems. Here are some of the best plants for hydroponic cultivation:
Lettuce: Lettuce is ideal for beginners due to its fast growth and minimal maintenance. Varieties like butterhead, romaine, and iceberg thrive in hydroponic systems. They require cool temperatures and can be harvested multiple times.
Spinach: Spinach is a nutrient-dense leafy green that flourishes in hydroponic systems. It prefers slightly cooler temperatures and grows quickly, making it a popular choice for fresh salads and smoothies. Regular harvesting encourages continuous growth.
Herbs (Basil, Parsley, Cilantro): Herbs like basil, parsley, and cilantro are perfect for hydroponics. They require minimal space, grow rapidly, and can be harvested frequently. They thrive in warm temperatures and moderate light, making them excellent for year-round indoor gardening.
Tomato: Tomatoes, particularly vine varieties, do well in larger hydroponic systems. They require good support structures, ample light, and regular pruning. With proper care, tomatoes can yield a bountiful harvest with rich flavors, perfect for sauces, salads, and cooking.
Capsicum (Bell Peppers): Capsicums are another excellent choice for hydroponic systems. They require a bit more space and strong light but grow quickly and produce high yields. Varieties include sweet bell peppers and spicy chili peppers, both offering vibrant colors and flavors.
Cucumber: Cucumbers need more space and support in hydroponic setups. They thrive in warm, humid environments and require a trellis for vertical growth. Hydroponic cucumbers often produce straighter and more uniform fruits, ideal for salads, pickling, or snacks.
Swiss Chard: Swiss chard is a versatile and colorful leafy green, ideal for hydroponic gardening. It tolerates a wide range of temperatures and continues to produce new leaves even after harvesting. Its vibrant stems add visual appeal to your garden.
Cherry Tomato: Cherry tomatoes are compact and well-suited for hydroponic systems. They grow quickly, produce clusters of sweet, juicy fruits, and are perfect for snacking, salads, and garnishes. Regular pruning and good light are essential for a healthy crop.
Kale: Kale is renowned for its health benefits and is an excellent choice for hydroponics. It grows best in cooler temperatures and can be harvested multiple times. Varieties like curly kale, dinosaur kale, and Russian kale offer different textures and flavors.
Broccoli and Cauliflower: These cruciferous vegetables can be grown in larger hydroponic systems. They require cooler temperatures and more space but produce large, nutrient-rich heads. With proper care, they can provide a consistent supply of fresh vegetables.
How To build A Hydroponic Garden
There are several types of hydroponic systems available for setting up gardens without the use of soil. Each type of hydroponic system varies in its design, plant selection, advantages and disadvantages, and spatial requirements. Below, we provide guidance for each of these hydroponic systems:
Choose A Hydroponic System
Deep Water Culture (DWC) involves suspending plants in a nutrient solution with their roots directly submerged in water, making it a simple and beginner-friendly system. The Nutrient Film Technique (NFT) allows a thin film of nutrient solution to flow over the roots, ideal for growing leafy greens and herbs. In an Ebb and Flow system, the nutrient solution floods the roots at intervals and then drains away, making it suitable for various plants. A Drip System slowly drips the nutrient solution onto the plant roots, supporting larger plants. Aeroponics suspends roots in the air and mists them with a nutrient solution, offering rapid growth but requiring more maintenance.
Gather Materials
Reservoir: A container that stores the nutrient solution. It should be large enough to accommodate the volume needed for your hydroponic system and made from a durable, non-reactive material like plastic or metal. It should also be opaque to prevent algae growth.
Growing Tray: Supports the plants and is typically positioned above the reservoir. It should be made of sturdy material with a design that allows for easy drainage and access to the nutrient solution.
Air Pump and Air Stone: The air pump supplies air to the air stone, which diffuses it into the nutrient solution. This setup increases oxygen levels in the water, preventing root rot and promoting healthy plant growth. Ensure the air pump is appropriately sized for your system.
Water Pump: Essential for circulating the nutrient solution in systems like Nutrient Film Technique (NFT) and Ebb and Flow. It should be powerful enough to deliver the solution effectively but not so strong that it causes turbulence or damage to plant roots.
Net Pots: Small, mesh containers that hold the plants and allow their roots to grow into the nutrient solution. Net pots come in various sizes and should be chosen based on the type and size of the plants you are growing.
Growing Medium: Inert material that supports the plants in the net pots. Common options include rockwool (which retains moisture well), clay pellets (which provide good drainage), and coco coir (which offers a balance of water retention and aeration).
Nutrient Solution: A balanced hydroponic fertilizer providing essential nutrients to the plants. Use a formula specifically designed for hydroponics, as these solutions are balanced to deliver the correct mix of macro and micronutrients.
pH Meter: Measures the acidity or alkalinity of the nutrient solution. Maintaining the pH within the ideal range (typically 5.5 to 6.5) ensures optimal nutrient uptake by the plants. Regular monitoring and adjustment are essential.
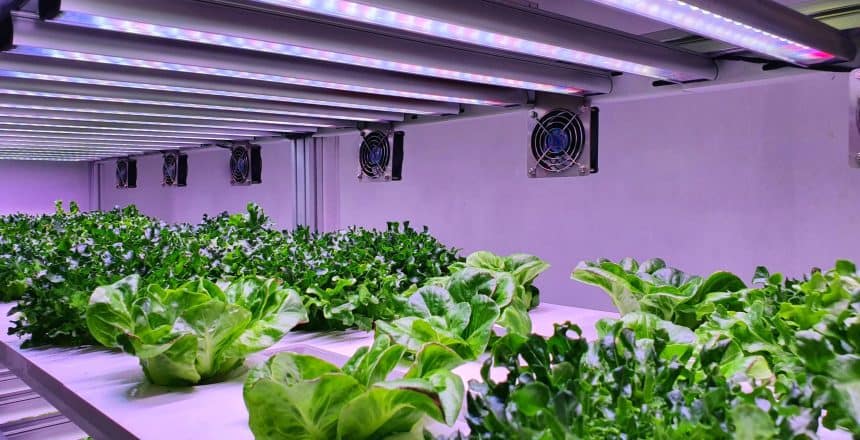
Lighting: Provides the specific light spectra needed for photosynthesis. LED grow lights and fluorescent lights are commonly used in hydroponic systems. LEDs are energy-efficient and can provide the full spectrum of light, while fluorescent lights are a more traditional and cost-effective option.
Timer: Automates the light and watering cycles, ensuring consistency and reducing manual intervention. Timers can control the duration and frequency of lighting and nutrient solution delivery, crucial for maintaining a stable growing environment.
Assemble The System
Set Up the Reservoir: Place the reservoir beneath the growing tray to collect excess water. Insert the air stone into the reservoir and connect it to the air pump, ensuring all connections are secure and leak-free. This setup increases the oxygen level in the water and helps prevent root rot.
Install the Water Pump (if needed): Position the pump in the reservoir and connect it to the growing tray to ensure proper circulation of the nutrient solution. Verify that the pump’s power is sufficient and correctly set to distribute the solution evenly.
Set Up the Growing Tray: Fill the net pots with the growing medium and place them in the growing tray. Insert seeds or seedlings into the net pots, ensuring there is enough space for root growth and that they are securely positioned.
Attach Lighting: Position the grow lights above the plants and adjust the height as they grow. Set the light schedule and intensity based on the plants’ needs, ensuring they receive adequate light.
Prepare the Nutrient Solution: Mix the hydroponic nutrient solution according to the instructions using water. Use a pH meter to check the pH level of the mixture and ensure it falls within the correct range. Regularly test and adjust the pH to maintain an ideal nutrient environment for your hydroponic garden.
Planting and Monitoring: Place seeds or seedlings into the growing medium in the net pots. Fill the reservoir with the nutrient solution, ensuring the water level reaches the roots without causing waterlogging. Program a timer for lighting and watering cycles; most plants need 12-16 hours of light daily. Regularly monitor water and pH levels, and provide necessary care to maintain plant health.
Deep Water Culture System
Deep Water Culture System (DWC), Floating Raft Technology (FRT), or Raceway Hydroponics effectively conveys the key aspects of these hydroponic methods. You provide clear information about how these systems work, emphasizing the submersion of plant roots in nutrient-rich water and the importance of oxygenation for root health. Additionally, you mention the ease of setup and low cost, which can be appealing to beginners or those on a budget. Overall, this description provides a solid overview of these hydroponic techniques. Below is an explanation of how to set up a Deep Water Culture (DWC) system:
Water & Aeration
Select a container with a depth of at least 12-15 inches to accommodate adequate water and nutrient solution. Mix water with a balanced hydroponic nutrient solution according to the manufacturer’s instructions. For optimal oxygenation, install an air pump connected to an air stone placed at the bottom of the container. This setup will continuously bubble oxygen into the water, ensuring that plant roots receive sufficient air to prevent root rot and promote healthy growth.
Growing Raft
Craft a floating raft from Styrofoam to fit snugly on top of the reservoir. This raft supports the plants while allowing roots to dangle into the nutrient solution. Cut holes in the Styrofoam slightly larger than the net pots, which should hold your growing medium such as perlite, vermiculite, or coconut coir. Place the net pots into these holes, ensuring the plant roots make consistent contact with the nutrient-rich water below for optimal nutrient uptake and growth.
Set Light Fixture
If natural light is insufficient, set up an artificial lighting system above the growing area. For incandescent bulbs, position them about 24 inches above the plants to avoid heat damage. For LED lights, maintain a distance of 6-12 inches, depending on the light’s intensity and manufacturer guidelines. Fluorescent lights should be placed 6-12 inches away from the plants. Adjust the height as the plants grow to ensure they receive adequate light for photosynthesis and healthy development.
Wick System
The wick system is an extremely simple form of hydroponics. In this system, plants are placed on top of a tray filled with a growing medium, which is positioned over a reservoir containing a mixture of nutrient-enriched water. Wicks extend from the reservoir to the growing tray. Through capillary action, water and nutrients travel up the wick and are absorbed by the growing medium. The nutrient solution is then distributed to the root system of the plants. Wick materials can include cotton rope, string, or felt. To create a wick hydroponic system, you can follow the steps below:
Select Container
Firstly, select two containers for your Wick hydroponic system, which can be made of either plastic or rubber. The upper container will hold the growing media, while the lower one will contain the water. Place two wicks in the bottom of the growing container. These wicks will absorb water from the reservoir and help supply moisture to the growing media for the plants.
Set Up Growing Medium
In a wick system, you can use a growing medium that doesn’t require frequent watering and effectively utilizes the capillary action of the wick. For this purpose, materials such as rockwool, perlite, and soilless mixes are suitable. This medium acts like a sponge, absorbing water slowly and providing nutrient solution when in contact with the wick. Set up the chosen growing medium in the upper tray and leave some space above for water in the lower tray. Now you can plant your seeds in the growing media.
Ebb & Flow System
The ebb and flow hydroponic system is a type of hydroponic system in which a grow bed is periodically flooded with water and nutrient-rich solution from the bottom of a reservoir and then drained back. This system typically involves a submersible pump inside the reservoir that supplies water and nutrient solution to the grow bed. Plants are usually placed in pots filled with soil, perlite, or coconut coir and arranged within ebb and flow trays or containers. Setting up an ebb and flow hydroponic system involves several steps:
Water Reservoir
Place the flood tray on a sturdy stand, ensuring there is adequate space below for the water and nutrient solution reservoir. Regularly check the water level and refresh the water and nutrient solution every one to two weeks to ensure plants always receive fresh nutrients. Additionally, use a line or siphon system below the tray to facilitate nutrient solution circulation, which helps the solution reach the plant roots effectively.
Connect a Fill Tube & Drain Tube
Install a submersible pump on top of the flood tray, ensuring it remains fully submerged and connected to the water in the tray. This pump will supply water and nutrients to the plants. Connect the pump to a timer to regulate its operation periodically. Position the pump appropriately so that water can flow back into the flood tray after being pumped out. The type of pipe and its placement will depend on the size and shape of the flood tray and the specific requirements of your setup. Ensure that the pipe allows for smooth and uninterrupted water flow. Regularly test the water flow through the pipe and ensure that proper circulation is maintained.
Connect A Submersible Pump & Timer
With a submersible pump, you can customize the duration and frequency of water flow according to the needs of your plants. You can determine how long you want the flood cycle to last and how often it occurs. This customization depends on factors such as the water requirements of your plants, the type of water supply system you have, and the size of your hydroponic setup.
Flood Tray
For cultivating your microgreen seeds, you’ll need a flood tray placed on a sturdy stand or table. Microgreen seeds are sown directly into the flood tray using a growing medium such as perlite. Ensure that each microgreen tray is twice the size of the bottom of the flood tray to accommodate enhanced height and quantity of microgreens.
Lighting Fixture
If you’re not reliant on natural light, you can add a light fixture to your system. For using a light fixture, you’ll need an appropriate space above your growing table. For LED lights and fluorescent lights, maintain a distance of about 6 inches and 12 inches, respectively, from the plants.
Nutrient Film Technique
The nutrient film technique is a hydroponic method where all the necessary nutrients for plant growth are added to a deep flow of water. In this method, water flows continuously in a water-resistant channel or tube, also known as a channel or pipe, and recirculation occurs within the empty troughs of the plants. Water flow in this method is very minimal, and the necessary nutrients for growth are directly obtained through the roots of the plants in the empty troughs. The nutrient film technique is particularly effective for warm-season crops like lettuce, spinach, and radishes. Setting up a nutrient film technique hydroponic system involves several steps:
Water Reservoir
To ensure the presence of oxygen in the water reservoir, you can add an aeration bubbler. This enhances the process of oxygenation in the water, especially in the lower part of the reservoir. The bubbler introduces air into the reservoir through an outlet pipe, and the bubbles created by the aerator help mix oxygen with the water. This process improves the oxygen level in the water and has a positive impact on the growth and nutrition of plants in the hydroponic system.
Fill Tube, Drain Tube & Pump
Add a black bin to the reservoir where the nutrient film will be stored. Then, connect the fill tube and drain tube so that water can flow from the reservoir to the tray. The fill tube will be connected to the submersible pump, which will control the flow of water into the flood tray. The drain tube will provide necessary drainage capability so that water can return to the reservoir after flooding and be reused. In this system, a primer is not needed because it continuously flows water in the nutrient film.
Growing Tray
Select a flat, durable tray that is large enough to accommodate all the plants and growing medium. This tray will hold the net pots and allow for easy access to the roots. Install tubing or channels on top of the tray to facilitate the flow of nutrient solution directly to the plant roots. For better water and nutrient distribution, use perforated tubes or PVC pipes to create holes for the net pots. These should be spaced evenly to ensure that all plants receive adequate nutrients. Additionally, ensure that the tray has proper drainage to prevent waterlogging and root rot.
Lighting
If natural light is insufficient or unavailable, use LED light systems specifically designed for hydroponic gardening. Select LEDs that offer a full light spectrum, including both blue and red wavelengths, to support various growth stages. Position the lights based on the size of your growing medium and the type of plants you are cultivating. For most setups, place LED lights 6-12 inches above the plants, adjusting as needed to avoid light burn or inadequate light exposure. Regularly monitor the intensity and duration of light exposure, aiming for 12-16 hours of light per day, depending on the plant species and growth phase.
Aeroponic System
In an aeroponic system, a mist of water and nutrients is regularly displayed within the air underneath the plants. The aeroponic system is an effective method where water is displayed within the air, requiring less than hydroponic systems. To create an aeroponic system, follow these steps:
Water Reservoir With Aeration
Start with a container specifically designed for holding the nutrient solution. This reservoir should be opaque to prevent algae growth and equipped with a lid to maintain humidity. Introduce aeration by adding an air pump and air stones to infuse the water with oxygen, which helps in nutrient absorption and root health. This setup allows the misting system to perform effectively by ensuring the nutrient solution remains well-oxygenated and free of contaminants.
Submersible Pump & Growing Chamber
Use an outlet tube or pipe of a submersible pump to pump water into the inlet of the mister or sprayer. Connect the tube to the inlet of the mister or sprayer using the outlet tube or pipe of the submersible pump. Place the mister or sprayer close to the roots of the plants so that the water can reach the roots efficiently. You will set up a tube or channel to regularly supply each seedling with a constant amount of nutrient solution, similar to the nutrient film technique.
Lighting
Install LED grow lights to provide the necessary light spectrum for photosynthesis. The light setup should include full-spectrum LEDs to support all growth stages, from seedling to flowering. Position the lights at an appropriate height above the plants, generally 6-12 inches, adjusting as the plants grow. Maintain a light cycle of 12-16 hours daily, depending on the plant species and growth stage. Ensure the lighting system is evenly distributed to cover all plants within the growing chamber.
Maintaining Your Hydroponic Garden
In a hydroponic system, food-grade plants are cultivated. Most food-grade plants require a minimum of 6 to 8 hours of sunlight. If you don’t have access to natural light, you can use a grow light system and set a timer for adequate light provision. The ideal temperature for food plants ranges from 60 to 70 degrees Fahrenheit. If the temperature of your light is high, the plants may wilt, so choose the type of light preferred by the plants. The ideal humidity for a hydroponic grow room is 45-55 percent. You can maintain humidity in the grow room using a hygrometer. For rapid plant growth, a sufficient supply of carbon dioxide is necessary in the grow room. You can choose a room with continuous airflow or use a fan or air circulation device if needed. The ideal pH for a hydroponic system is between 5.8-6.2. If your water pH is incorrect, adjust it using pH control solutions. To ensure proper nutrient uptake, regularly supply nitrogen, potassium, phosphorus, calcium, magnesium, iron, zinc, chlorine, and other essential nutrients. With a proper hydroponic system, you can achieve your desired yield.
FAQ
How do I start hydroponics for beginners?
To start hydroponics as a beginner, choose a simple system like Deep Water Culture (DWC) or Ebb and Flow. Gather essential materials: a reservoir, growing tray, net pots, growing medium, air pump, water pump, and nutrient solution. Set up the reservoir below the growing tray, install the pumps, and place net pots with seedlings in the tray. Add the nutrient solution, adjust the pH, and provide adequate lighting.
How to make a hydroponics system step by step?
- Choose a simple type like Deep Water Culture (DWC) or Ebb and Flow.
- Obtain a reservoir, growing tray, net pots, growing medium, air pump, water pump, and nutrient solution.
- Set up the reservoir, install pumps, and arrange the growing tray.
- Mix the nutrient solution and adjust pH
- Place seedlings in net pots, fill the reservoir, and start lighting.
Do hydroponic gardens need a pump?
A typical hydroponic garden often does not require a pump, except for specific systems. For example, Deep Water Culture (DWC) needs an air pump to oxygenate the roots and prevent rot. However, systems like Nutrient Film Technique (NFT) and Ebb and Flow use water pumps to circulate nutrients to the plants. While pumps are essential for some systems, they may not be necessary for all hydroponic setups.

